
Yesterday I found this great site called The Beauty Department with very nice tutorials and DIY's,
So I went through a couple of pages and found this:

Can't believe I never thought about using tape!
I tried something out today... with tape oufcourse and it turned out pretty nice,
so I wanted to share it with you and maybe you can try it out, too!
I tried something out today... with tape oufcourse and it turned out pretty nice,
so I wanted to share it with you and maybe you can try it out, too!

This is how it turned out. It's the first time I've done this kind of nailart, so It doesn't look prefect,
But the more I'll practice, the better it will look! You can also add more stripes if you want to.
So now'll finally show you how to create this!
But the more I'll practice, the better it will look! You can also add more stripes if you want to.
So now'll finally show you how to create this!
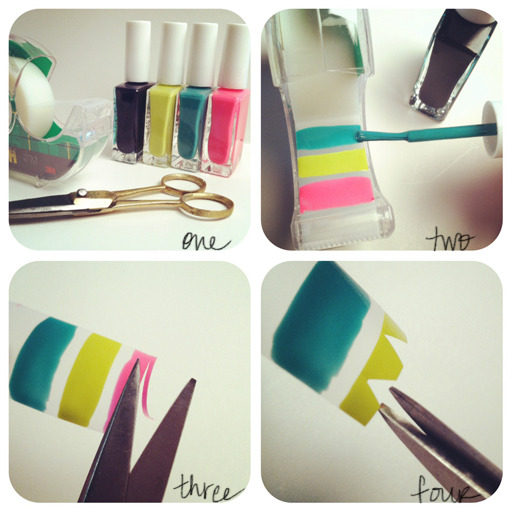
The items you'll need:

Tape, 3 nailpolish colors (The gold color is missing on this picture), nailpolish remover, cotton buds,
a basecoat/topcoat and a nail clipper.
a basecoat/topcoat and a nail clipper.
1. Put the golden color on the tape and let it dry.
2. Use a basecoat, let it dry and start applying the red colors.
3. Let that one dry, too and put tape around your fingers,
so you don't have to remove alot of nailpolish when you're done.

(I just put tape on one side, because you won't touch the other side).
4. Now put a piece of tape on your nail and apply the purple color.
5. Don't forget to take the tape off as soon as you're done painting that nail!
6. Ofcouse you should let the purple color dry and after that you can cut the tape with the golden color on it.
7. Stick the pieces on the middle of your nails and use a topcoat.
8. Remove the nailpolish around your fingers and you're done!
And if everything went well, it will look similar to this:

Hope you guys could understand it and if you have any questions , please let me know!
By the way: I made a small header change and changed the sidebar.. just a little though.
Also, my mom and I will start blogging very soon, so keep an eye on our travel blog!
(You can also find the link in the sidebar).
Have a great evening! <3
By the way: I made a small header change and changed the sidebar.. just a little though.
Also, my mom and I will start blogging very soon, so keep an eye on our travel blog!
(You can also find the link in the sidebar).
Have a great evening! <3
